The ARP Control protects your RV fridge. Use this page for RV fridge wiring, Norcold wiring, Dometic wiring, and different Fridge Defend by ARP wiring schemes.
This web-page is to be used as a reference in combination with the ARP installation manual. Please scan through this page if you are having problems or have a special situation that may be covered within the contents of this page. Each heading indicates what the wiring diagram addresses and presents solutions.
REQUIRED TO DOWNLOAD INSTALLATION INSTRUCTIONS - WEB PAGES ARE SUPPLEMENTAL - EACH VERSION OF CONTROL HAS INTRICACIES REQUIRING THE WRITTEN INSTRUCTIONS.
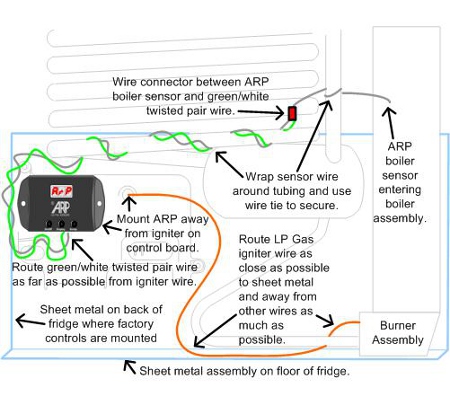
We have found that not all igniter wires are wired the same. As a result, on rare occasion the LP Gas igniter can cause the ARP Control to turn off the fridge when the LP Gas igniter is active. Using the first drawing and the following text we will explain how to solve this problem if it should occur on your fridge:
1) Make sure that the ARP Control box is as far as possible from where the igniter wire exits the factory fridge control. In extreme circumstances the ARP Control may need to be mounted on a sheet metal plate that is in electrical contact with the sheet metal on the back of the fridge. Another option is to mount the ARP Control directly to the sheet metal on the back of the fridge just like the factory control, this option is dependent on how much room there is.
2) Find the LP Gas igniter wire. Unplug the wire from the factory controller and route the wire along the sheet metal backing where your factory controls are mounted. Try and keep the igniter wire away from the other wires as much as possible. Also, aluminum HVAC duct tape can be used to secure the wire to the sheet metal. The aluminum tape will protect the wire and help keep the igniter wire from putting excessive noise into the ARP Control.
3) Route the ARP boiler temperature sensor as far as possible from the igniter wire. We have found that routing the green/white twisted pair away from the igniter wire at the factory control is best. Then route the green/white twisted pair wire up to the absorber coil. Traversing the absorber coil wrap the green/white wire around the absorber coil. Before connecting the ARP boiler temperature sensor, do a single wrap around the tubing so that the wire is as far away from the 120VAC electric heaters as possible. At this single wrap of the boiler temperature sensor wire use a nylon wire tie to secure the wire. Now, connect the green/white twisted pair wire to the ARP boiler temperature sensor wire.
If the above steps do not solve the issues with the ARP Control function while in the LP gas mode, please see the following information:
Example of how to ground a Dometic: Ground Dometic Control
Example of how to ground a Norcold: Ground Norcold Control
Adjusting burner igniter gap is very important, the wider the gap the better for minimizing electrical noise: Arc Gap Adjustment
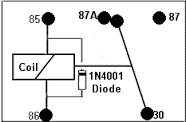
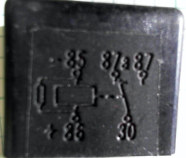
This drawing and photo are typical automotive 30A clamped type relay. Please note that the drawing of the relay coil has a 1N4001 diode across the relay coil. The photo shows a box next to the relay coil between terminals 85 & 86. This type of relay is required when using the ARP Control in combination with a relay. The clamping diode allows the inductive energy within the relay coil to be dissipated in the relay coil. If an un-clamped type relay is used with the ARP Control the energy from the relay coil will cause the ARP solid-state internal relay to fail, this is not covered by warranty.
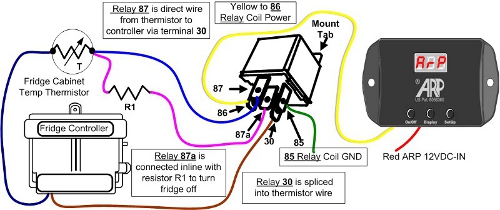
The above diagram shows how to use the ARP Control and a relay (contact ARP for proper relay type) to bypass the refrigerator cabinet thermistor. The objective is to control the fridge with the ARP by fooling the fridge temperature sensor (thermistor) into thinking that the fridge is very cold, thus turning off the heat sources when the ARP determines that the fridge boiler has overheated. This method has a large advantage because the fridge factory controller always is powered and when wired correctly controls the heat source just as the fridge came from the factory.
In a nutshell, Dometic wiring and Norcold wiring is similar due to the fact that both of these fridges use a NTC type thermistor. NTC thermistors increase in resistance when they get colder, thus we use a relay to put resistor R1 in series with the fridge thermistor in order to increase the resistance seen by the factory fridge controller.
Once this method of control is determined to be preferable by the installer, all one has to do is locate the thermistor wires going to the factory controller and splice the above wiring into one of the thermistor leads. It is important to have very good connections in the wiring that will not introduce extra resistance. Also, the value of R1 must be determined for a particular fridge by the user manual or by trial and error.
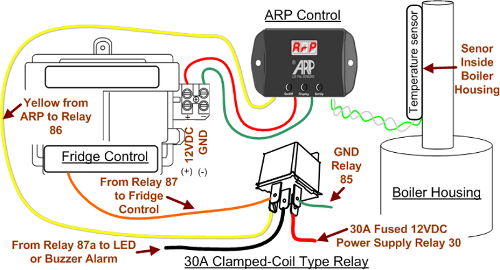
This drawing is for applications such as the Dometic NDA1402 and Norcold 2117, or other fridges that have high amperage due to electric defrost heating elements. The ARP Control solid state relays are only capable of 3.5 amps of power draw which is sufficient for a majority of applications. It is important the correct relay be used with the ARP Control; a clamped coil type relay is required for warranty of the ARP Control internal relay.
Please note that this is the wiring drawing for the v2.1 control, the v3.1 control has the ability to invert the control logic, click here for more information
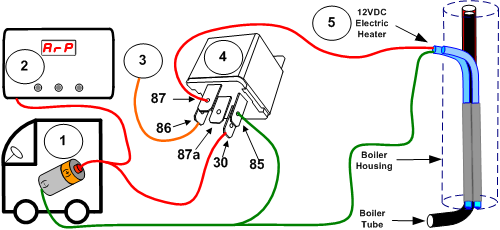
In order to use the ARP Control with a Norcold or Dometic fridge that is a 3-way fridge, where 3-way means the fridge can be run off of 12VDC heater, a relay for supplying power to the 12VDC heater is needed on some fridges.
(1) All fridges have two wires delivering the 12VDC power supply from the RV. When there is a 12VDC heater on the fridge, the wiring must be as shown using a relay (4) to power the 12VDC heating element. Note that the +12VDC power supply coming from the RV (1) to the fridge has to split, one line powering the ARP and the other supplies power to terminal 30 of relay (4).
(2) The ARP Control would be wired according to the installation instructions with the exception that the red 12VDC power wire would branch before the ARP Control so that relay (4) would handle the power load required by the 12VDC heater.
(3) Number 3 represents the factory controller, be it a Norcold or Dometic. From the factory the 12VDC heater (5) may be wired directly to controller number 3. Some Dometic models are wired in a similar manner to what is described here, in this case just wire the ARP as outlined in these instructions.
(4)
The load relay shall be wired as follows:
Terminal 30: The power supply entering the
cooling unit compartment will power this terminal, make sure
adequate fusing is on the RV.
Terminal 85: The relay coil will be grounded
through this terminal.
Terminal 86: Preform the next step,
terminal 87 before this step. Once terminal 87 is wired, run a wire
from where you removed the +12VDC electric heater wire on the
factory control (3) to terminal 86 on the relay. This wire will
activate the relay coil and in turn supply power to the 12VDC heater
(5).
Terminal 87: Locate the +12VDC power wire
from the electric heater (5) to the factory control (3), remove it
from the factory control (3) and place this wire on the relay
terminal 87.
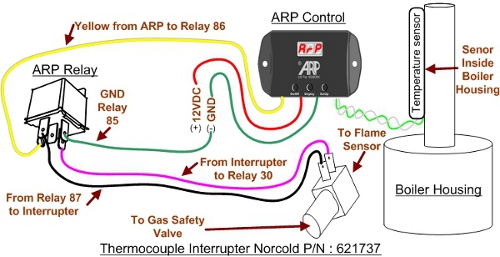
If your fridge starts on gas by your pressing a button and holding it until the gas flame stays lit, you have a manual control. Above is the wiring for this type of installation. Some applications use the Norcold part number 621737 and others may be wired directly to the relay because the thermocouple (flame sensor) has wires rather than a tube with a threaded end that fits into the Norcold Interrupt adapter.
The below two links will give a wiring diagram for how to control manual fridge 120VAC
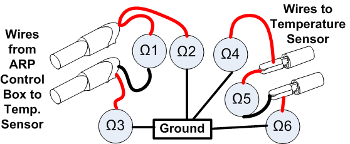
Please note that all measurements for the following discussion are made with the power to the ARP Control disconnected. Unplug the red wiring going to the ARP Control, otherwise the reading will not be accurate.
Each of the Ω1, Ω2, Ω3,… is a representation of using a multimeter (DMM) to measure the resistance either between the two wires or from the respective wire to the ground. Please note that the color code of the wire has no meaning because there is no polarity for the temperature sensor. Thus, Ω2 or Ω3 maybe either the white or green wire.
Values:
Ω1 ≈ 2.2M
Ω2 ≈ 2.2M
Ω3 ≈ 1k
Ω4 = OPEN or OL on typical multimeter.
Ω5 ≈ Use RTD table in Troubleshooting Guide to determine this value.
Ω6 = OPEN or OL on typical multimeter.